
The Hounsfield Unit, Window Level & Width
The Hounsfield Unit
The Hounsfield Unit (HU) is a way to (quantitatively) measure tissue density.
- More dense structure absorbed more radiation = image is brighter e.g. bone (+1000 HU)
- Less dense structure absorbed less radiation = image is darker e.g. air (-1000 HU)
- The reference point is water, which is defined arbitrarily as 0 HU.
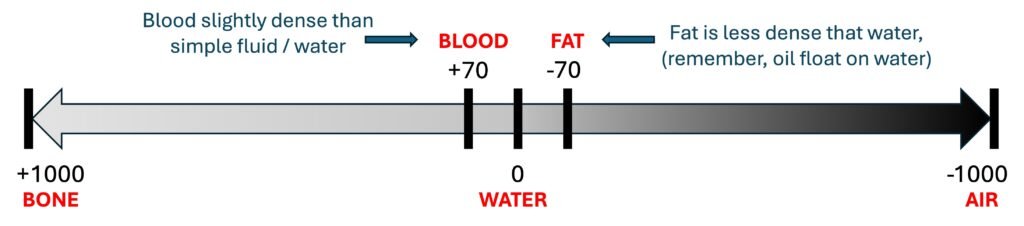
Image 1: common structures and their corresponding HU
Now that we understand the concept of HU, we can talk about window width and leveling.
Window Level & Width
If you notice from the image above, the human anatomical structures have a huge variation in tissue density. We have air in the lung which is about 1000 times less dense than the water on one end and calcium in the bone which is about 1000 times more dense than water on the other end.
While HU provides a useful numerical scale to describe these differences, it is not feasible to represent the full range visually, as human vision can distinguish only between 30 and 250 shades of grey.
This is where the concept of window width and leveling came about. Think of this like applying different lenses to different groups of tissue.
Window level (WL) is the midpoint HU and window width (WW) is the range of HU shown. It easier to show you some examples first. Bear with me for a sec. Below are some of the common settings.
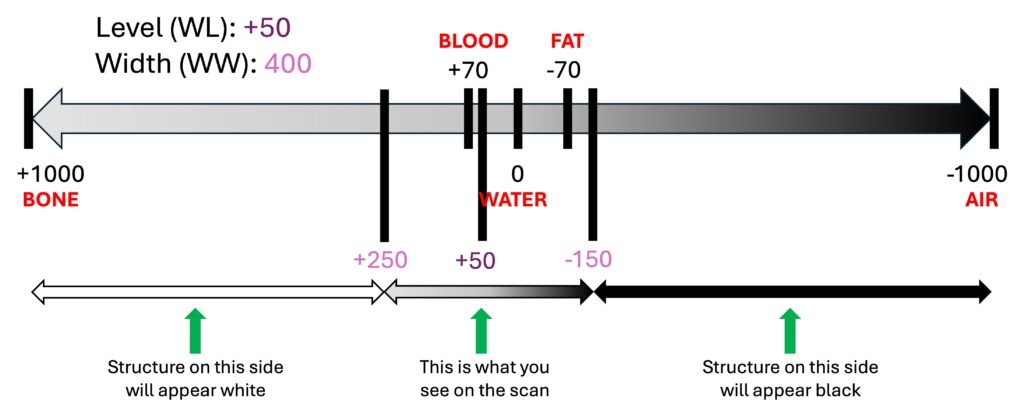
Image 2: Window level and width for soft tissue
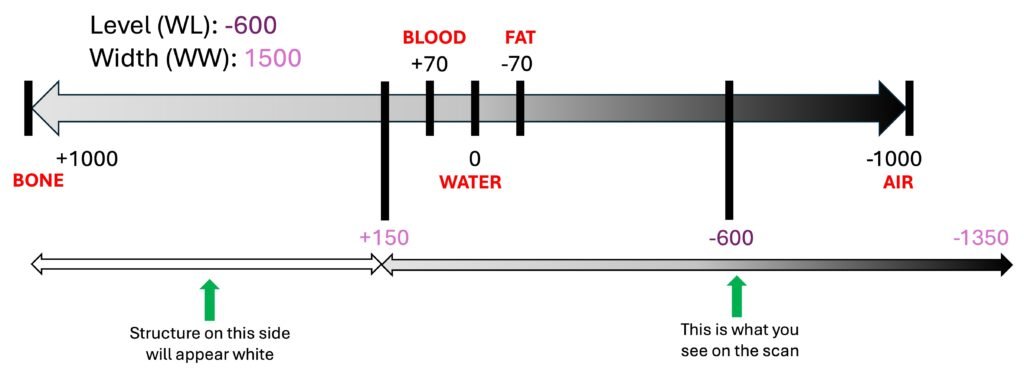
Image 3: Window level and width for lung
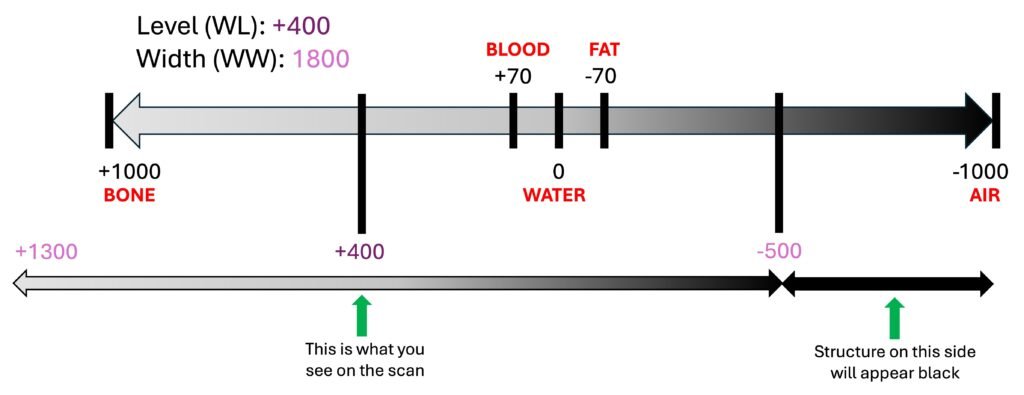
Image 4: Window level and width for bone
As the WL (read: midpoint) value gets higher, the overall scan gets brighter. This is not always a good thing. Sometimes when it gets too bright you can be distracted by all the “noise” and artifact.
The narrower WW is used to examine group of tissue with similar density such as the abdomen or the brain. This gives a better overall contrast to the image.
Conversely, a broader WW is suitable when evaluating regions with widely varying densities, such as the lungs where both air and vascular structures are present, side by side.
Once you understand this you can customise the settings and tailor it to what you are looking for.
For examples, when you are looking for PE in CTPA, you can set:
- WL to 0.5 of HU of the pulmonary artery
- WW to 2 x HU of the pulmonary artery
Have a try and see it for yourself !!!
References:
- Broder JS. Diagnostic Imaging for Emergency Physician. 1st North Carolina: Elsevier 2011
- StatPearls Publishing. Hounsfield Unit. [Internet]. Treasure Island (FL): StatPearls Publishing; 2023 Mar 6 [cited 2024 May 22]. Available from: https://www.ncbi.nlm.nih.gov/books/NBK547721/
- Radiopaedia. Windowing (CT). [Internet]. Radiopaedia.org; 2017 Mar 22 [updated 2024; cited 2024 May 22]. Available from: https://radiopaedia.org/articles/windowing-ct
- TeachMeAnatomy. Basic Principles of CT Scans. [Internet]. TeachMeAnatomy.info; [cited 2024 May 22]. Available from: https://teachmeanatomy.info/the-basics/imaging/computed-tomography-ct-scans/
- Life in the Fast Lane (LITFL). Abdominal CT: Windows basics. [Internet]. LITFL; 2024 Aug 21 [cited 2024 May 22]. Available from: https://litfl.com/abdominal-ct-windows-basics/
- Radiology Cafe. CT Overview: Radiology Basics. [Internet]. Radiology Cafe; 2021 Oct 10 [cited 2024 May 22]. Available from: https://www.radiologycafe.com/radiology-basics/imaging-modalities/ct-overview/
Recent Posts
- Piezo 101: Squeezing Electricity Since 1880 April 16, 2026
- Central Venous Access Device (CVAD) April 11, 2026
- Pneumonia – CXR March 28, 2026
- Right Ventricular Systolic Function March 7, 2026
- Right Ventricular Dimension February 27, 2026